
Many thanks to Ivo Dmitrov for the fantastic photo at the Island Fantasy Ball in Nanaimo.
Many thanks to Ivo Dmitrov for the fantastic photo at the Island Fantasy Ball in Nanaimo.
It has been a good long while, but dressmaking is finally happening here. We have been busy with practice, competition and with a new, wonderful grandbaby. Our first:-)
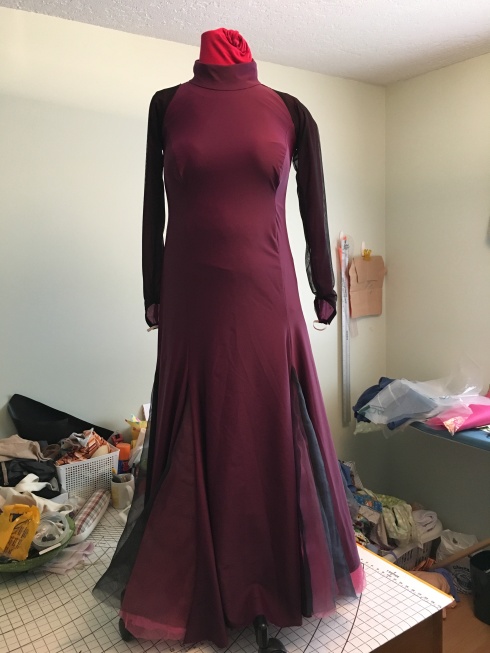
This dress has been progressing at a glacial pace, but now looks like a dress, at least. We are working on the premise that instead of standing out from my wonderfully tall partner, if I blend in a bit more it will look like we “match.” It was inspired by watching a similarly height challenged couple in which the lady wore black.
“That will never work!” I thought, but as I watched, I realized that it really did work, partly because the usual colour contrast of her bright colours against his black suit wasn’t there, but also because they looked like a pair that belonged together.
So rather than go straight to black, this one is a deep burgundy with black accents. Stoning to be discussed shortly!
Just a teaser, folks, but there has been work done on a new dress and I will get some progress reports going soon.
Or day…day is actually better. You get more drying time and that is good. The down side of daytime nail painting is that you are likely to have tasks that need to be done shortly after the nails are dry. So really, it is all about planning. There are web pages and videos galore explaining how to actually put brush to nail, but the planning is important.
We have so many wonderful friends, family and coworkers who follow our dancing and it is always lovely that they remember we had gone off somewhere to dance, though we are rarely 100% comfortable telling them our results. Dancesport is judged and as such, is both predictable – most judges will dislike our height difference – and unpredictable – same judges unexpectedly fall in love with one or two couples that we almost always finish above.
Judged sports are weird. Ask my partner/spouse/design consultant about judged sports and he will give you a serious rant about how awful they are and how they really shouldn’t exist. But don’t ask him to give up competing in the ballroom!
There is a wonderful blog post at Riot and Frolic about this. Kate Bratt is a professional dancer in the US and her blog is great reading all the time. But Why I’m Okay Not Making the Final is especially pertinent to our dancing right now.
It isn’t so much a list of excuses as much as a list of what IS for us right now and an understanding of what our goals for competition need to be. Now – to be fair, she does have the “four little kids with one baby under a year” card to play, which I don’t have, but there are many reasons we didn’t and shouldn’t have placed at our last two competitions.
So really it has been about our personal goals lately and will continue to be for awhile.
Next week is our Clubs Closed competition (more of a demo, really), so another chance to don the garb and glue on the lashes. Then a few weeks before the new and improved Pacifica Ball!
In Grade 8 we had a sewing teacher named Mrs. Lyons. When she was expecting her first baby we wanted it to be a girl so she could name it Karen. And her middle name would be Feedingof:-) I think it ended up being a boy. Too bad.
Basic nail looking-after is not hard.
Soooo….last year at Easter we went to the Canadian Championships in Calgary, Alberta. I really wanted my nails to look nice and, because my nails have almost always peeled and peeled nail areas don’t hold on to polish, I caved and got acrylics. And they looked gorgeous. And since they put gel polish on them, they looked gorgeous for quite a few weeks.
And then they started to come off and then I had to deal with the fallout. Yuck. Again. Enter our good friend Mr. Google (or maybe she is Ms. Google. We don’t really know.) Since then, I have found good, bad and indifferent sources of information about how to manage nails.
If you spend any amount of time doing this, you will find a couple of sources cited all the time. Makeup Alley is one of them. Their message board dedicated to nail care does have nail care tips, but generally at the moment it is a nail art board. Ask questions and they will give you quick, friendly and very helpful information, but the majority of the daily reading is nail art “spam” (which I think means, “show polish and manicure”) photos of NOTD (nail of the day) and lots of discussion of the many, many, many colours, brands, sales, wish lists etc. of nail polish. But not an easily searchable resource.
Loodieloodieloodie is the improbable name of one of the best resources online for all things nail related. Along with many gorgeous photos of her magnificent nails, “Loodie” gives wonderful tutorials on all sorts of nail issues. And she is a self-proclaimed “geeky scientist” so she explains why acetone is not the enemy of nails (that would be water) and other great stuff. But she is no longer actively blogging.
So I have learned some stuff in this quest and I will share it with you here. Today’s tips are about products.
1 – base coat. I bought base coat. It didn’t help! BUT. There is a thing called ridge filling base coat. Guess what – it not only fills ridges, it also sticks to peeled nail areas. Bam! Game changer. As soon as I tried this stuff, things started getting better. I have 3 brands now and haven’t formed a firm opinion of which is best. Stay tuned.
2 – 100% acetone. Best thing ever. You need it to remove gels, but it is also quicker and easier to use for removing any kind of nail polish. And yes, you can use the stuff from the hardware store if you really want to go the cheapest route. Add a bit of water and glycerine and you have a knock off of a pricey brand of moisturizing polish remover. Instructions from Loodie.
3 – Quick dry top coat. I bought top coat. It helped, but I often messed up the polish before it dried. Putting the top coat on very soon (2 – 5 minutes after the last coat of polish) helped, but I would still get dents, dings and even sheet marks the next morning in spite of doing my nails many hours before going to sleep. Quick Dry Top Coat. Sally Hansen in the red bottle. Another game changer!
My nails are still peeling and they are not yet at a place that I consider photo-worthy. But they are a nice length and they hold polish for 3 – 4 days at a time. Yay!
Well, this gown and the yellow studio do not play well together, but here it is. There will be another float on my right elbow, proper hair (the real fake hair – this is the fake fake hair), makeup, earrings and, as always, a strong possibility of more rhinestones, but this is the general picture.
Fingers crossed for an injury free practice today, so there is a possibility of competition next weekend.


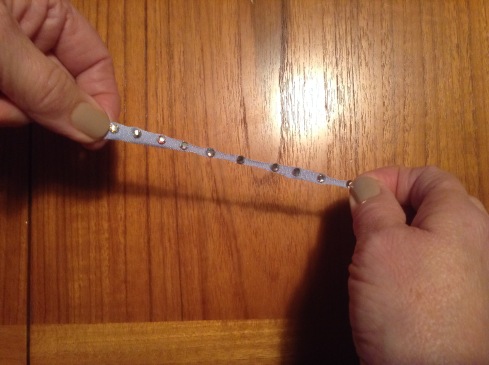
Figuring out how to get rhinestones off an old gown is an interesting challenge. There don’t seem to be any instructions anywhere on how to remove jewel glue and no ideas even for a solvent that would work. The only person I knew who had tried to de-jewel a gown had soaked pieces of the dress in water and laboriously picked them off. Sounds too hard to me!
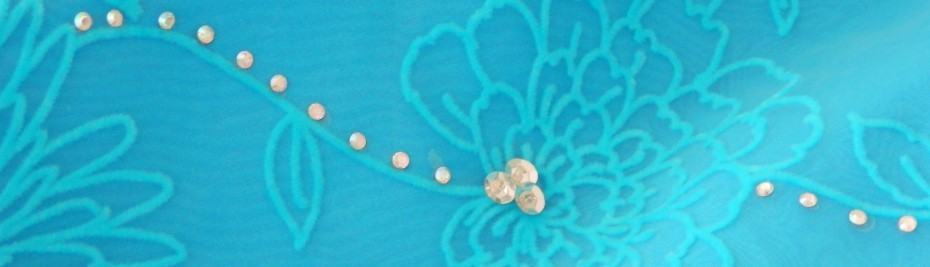
But as I slowly cut the Disney Princess into strips of stones, I noticed that small stones would almost fall off if the fabric was pulled tightly. It only works well for stones under 20 ss. Larger ones will come off, but the foil backing almost always pulls away. Fine if you want clear stones, but keeping the AB effect is nice.
So here is the strip of fabric with small stones:
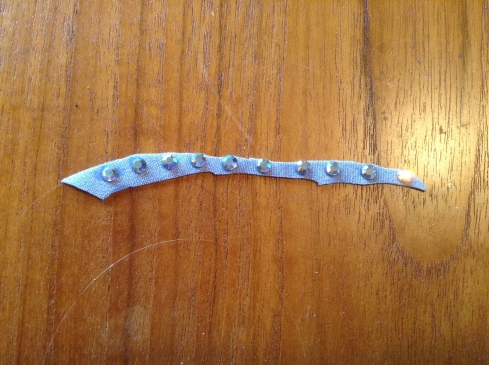
Give the strip a bit of stretch:
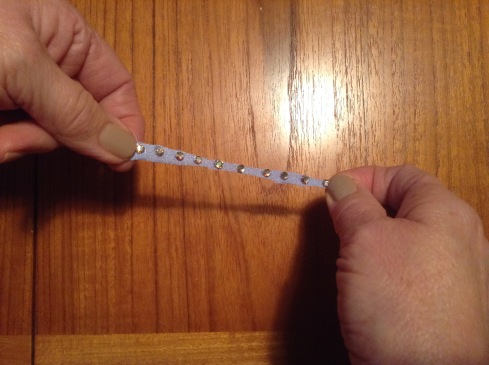
And a bit more:
And more:

Be careful not to break it (but sometimes it will anyway):
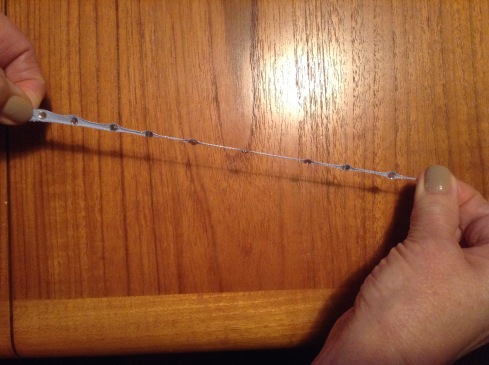
If you are lucky, the stones will just pop right off the fabric:

But even if they don’t, you can now run a thumbnail along the strip and the rest will tumble off.
I did this in front of the TV with the strips in a giant plastic mixing bowl to catch the stones. They do tend to fly around, so the bowl worked well as a catching device. Perfect for watching ballroom videos on YouTube. I recommend some Strictly Come Dancing – the UK version (original) of Dancing With the Stars.
The process with larger stones will be coming along soon.
Dance is an eternal story. Let us continue to write it.
MAPS FOR THE INNER JOURNEY
Just another WordPress.com site
Dressmaker| Author| Blogger| Freehand cutter
exploring life on the dance floor
Nancy Roman
An alternative to the stereotypical fashion figure templates
1 novice sewist, 100 Kwik Sew Patterns
Because it turns out that loving to dance matters way more than following the "rules."
Just another WordPress.com site
Ballroom Dancing, Weight Loss, Inspiration, Community
Just another WordPress.com site
